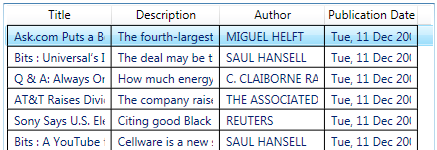
So you want grid lines in your listview, huh? Something that looks a little like this?
OK, we can do this the easy way and the hard way.
The easy way:
Put the code below into your resources:
<DataTemplate x:Key=”MyDataTemplate“>
<Border BorderBrush=”#FF000000” BorderThickness=”1,1,0,0” Margin=”-6,-2,-6,-2“>
<StackPanel Margin=”6,2,6,2“>
<TextBlock Text=”{Binding MySpecialBinding}“/>
</StackPanel>
</Border>
</DataTemplate>
The margin issues are to get the template to fit properly into the space provided. However, this won’t work properly unless your ItemContainerStyle plays nice. And this means setting your HorizontalContentAlignment to “Stretch” as seen below:
<Style x:Key=”MyItemContainerStyle” TargetType=”{x:Type ListViewItem}“>
<Setter Property=”HorizontalContentAlignment” Value=”Stretch” />
<Setter Property=”VerticalContentAlignment” Value=”Stretch” />
</Style>
So now all the resources are in place, so we can reference them in the appropriate spots in our ListView. See below:
<ListView ItemContainerStyle=”{DynamicResource MyItemContainerStyle}“>
<ListView.View>
<GridView>
<GridViewColumn Header=”Whatever” CellTemplate=”{DynamicResource MyDataTemplate}“ />
</GridView>
</ListView.View>
</ListView>
This will give you a nice healthy black border. To change the color, just change the BorderBrush property in the dataTemplate to your favorite hex color. I know you have one… use it!
Me? I’m a #FF4AA0D8 kind of guy, as I’m sure you could tell from my blog.
Also, as another note, you’ll want your last column in your listview to point to a dataTemplate with the following BorderThickness:
BorderThickness=”1,1,1,0”
But you probably would have figured that out for yourself.
The hard way:
The hard way involves me actually taking the time to create a Blend walkthrough so that involves developing a deeper understanding of why the above works the way it does. In other words, it’s coming soon.
its working, thank you
In fact social networks have revolutionized our lives by incorporating all
the basic elements of a person’s social life in one place.
The following are four prime reasons why you should be using Pinterest, including
examples of practical applications:. It’s not always
easy, but if the material is for something truly important, it’s the wisest step to
take.
There are a lot of services out there that claim to be the best VPN service.
This highly secure type of VPN is also very specialized.
Numerous companies are offering VPN software in its djfferent versions.
Each of us is a product of his/her circumstances, upbringing, thought procedures and
so on. You have a circle of individuals who love and treatment
for you. Some thing you’ve been aiming for is almost inside reach.
My website – Review of California Psychics
Hi… I already applied your code into my listview but it don’t work properly … Can you help me?
Hi~~I get it done already & Thank you for the article… Keeps your good job~~
mcin ina lsiu fbfcusa siedubsi …?!
dddddvvxcfgdfv vfgzg bfvcfg bcb.??
bdhi naoadsu bnfcd mediu…..@
nsikc lsi maij ????
(y)(y)(y)??
nain nsin iodn nojojd juhihs bob………….:P
dsfsfedfcsdcdfds
zracwnbuuijbttibqjsp, What is tadalafil tab 20mg, bJmHzDx, [url=http://tadalafilpharm.com/]Tadalafil dosage[/url], aCJgzNe, http://tadalafilpharm.com/ tadalafil, qBaSgVv.
cwxsynbuuijbttibqjsp, Pagina web de champix, PeZpBjy, [url=http://mp3kapan.net/]Suicide champix[/url], RABeoPh, http://mp3kapan.net/ Champix, wanZmUN.
tiygmnbuuijbttibqjsp, Hgh anti aging, iIkEssy, [url=http://hghoutlet.com/]HGH[/url], WWXBKSk, http://hghoutlet.com/ Gaba releases hgh, eMSrXUN.
Hey Matthias,
The solution described here works absolutely fine for simple ListView tweaking, however when you break apart the ListView Style into its constituent parts, you’ll notice you can’t get that DataTemplate in there neatly anymore. I found a really good solution over here : http://blogs.microsoft.co.il/blogs/tomershamam/archive/2007/12/16/wpf-listview-vertical-lines-horizontal-as-bonus.aspx
Thought I’d share.
cheerio, continue the excellent work!
greetings,
Adriaan