So… you’ve got your listview and you want your items to look a certain way. In this post, we’ll look at changing as many things as we can inside the ListView ItemContainerStyle.
First things first… getting to the ItemContainerStyle using Blend. With the ListView selected, go to the top menu and click:
Edit Other Styles -> Edit ItemContainerStyle -> Create Empty…

Name your Style and you get tossed into Style editing. Here, you can do all sorts of great things, like… um… changing the background or something.
OK, I’ll fess up, I’ve found the ItemContainerStyle to be good for the following things (and not too much else):
- Giving your items a nice border.
- Changing up and down margins (how far apart your items are from one another)
- Changing the HorizontalContentAlignment (like in this post on centering items in a column)
- Changing the VerticalContentAlignment (if you have a thick item, you can get your data to align to the top or center or whatever)
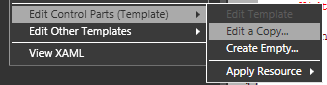
However, in order to get to the real fun stuff with ListView items, we want to go into the ItemContainerStyle template. So right-click on the “ItemContainerStyle” in your “Objects and Timeline” panel and go to:
Edit Control Parts (Template) -> Edit a Copy…
And now you have a copy of your default ListViewItemTemplate. If you want a good example of how a lookless control is constructed, head here. You’ll see how they use split grids and transparent gradients to get a look that maintains it’s feel even when the base background is changed. I’m working inside Vista, so this is what the visual tree of my ListViewItemTemplate looks like:

But if you’re like me, what is interesting about this particular template is not the visual tree… it is the triggers that the template hands to you. Lets look at these triggers one by one.
(If you don’t know where the triggers are, they’re above the Objects and Timeline pane and they look like this:
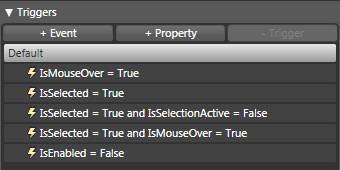
Clicking on a trigger will give you a preview of what that trigger looks like and will also allow you to change the properties of anything inside the template that will implement when the trigger is active.
You can put these same triggers into your ItemContainerStyle and, as a general rule, I would recommend it. As a general rule, I would recommend putting as much into the style and staying out of the template for the sake of simplicity. However, the style does have some pretty significant limitations, especially in this case. So, for the meantime, we’re just going to futz with it as it has been given to us.)
IsMouseOver = True

Kind of obvious what this does.
IsSelected = True

Again, kind of self-explanitory. When an item is selected, this is what you get.
IsSelected = True and IsSelectionActive = False

This is the default state of the first item in your listview before you’ve done anything to it. I have to admit, it took me quite some time to figure that out. The designers I was working with thought this style would confuse users and so we got rid of it. If you want to get rid of it, just delete this trigger and you’re golden.
IsSelected = True and IsMouseOver = True

In this example, it is subltly different than the IsMouseOver alone, but you can see the difference.
IsEnabled = False

I vaugely recall working on a project in which I tried to get individual items to unenable and I vaugely recall it not working very well. It could be because I was trying to do it in XAML, but the example you’re seeing here is when the entire ListView has IsEnabled set to “False”
A couple of suggestion for getting a good feel of the ItemContainerStyle triggers:
- change the background when the user selects an item
- change the height when the user selects AND mouses over an item.
- change the visibility to “Collapsed” when the user mouses over an item. (This one is sure to make your users roll on the floor with laughter… shortly before they come after you with torch and pitchfork in hand.)
All of these triggers are property triggers, so they are not (as they stand) suitible for triggering any animations. If you’re interested in seeing animations in your ListView items, check out this post (coming soon).
If you’re more interested in what you can do with triggers, check out this post (coming soon).
If you’d like to have that nifty “every-other-item-is-gray” thing going on, here’s a post for you while I try to whip up something of my own.
Please sound off with any more comments if you have additional questions.
For example, if the USA VPN server is far from the source computer,
the connection is slower. And, it is also useful for connection analysis – as it
has request logging to track network activities as well as security attacks.
Each packet released to the Internet may travel a different path than the packet sent beforde or the packet semt
after.
Hello, just wanted to tell you, I loved this article. It was helpful.
Keep on posting!
میگه: :چجوری باید تعداد برترین مطالب رو زیاد کنم ۳ تا فقط میاره !کد زیر رو در فایل lsidebar.php پیدا کنید و به جای ۱۵ هر عددی که خواستید بذارید$result = $wpdb->get_results( SELECTcomment_count,ID,post_title FROM $wpdb->posts ORDER BY cenmomt_countDESC LIMIT 0 , 15 );
Thank you thank you thank you, I totally forgot about ItemContainerStyle today as they’ve buried the edit Styles in Blend. This is exactly what I needed, finally have my crazy listbox working.
Sean
I had the same issue as Gary… it seems that blend will use a content presenter instad of a gridviewrowpresenter when you initiate the template/style…as a result, replacing the content presenter with the grid view row presenter works quite nicely!
I’ve followed the article through several times now, step by step and I simply cannot reproduced the list view item control template using your steps above. The only way I can access the correct control template is by right-clicking on a ListViewItem (the object, not the style) in the ‘Objects and TimeLine’ box and selecting ‘Edit Control Parts (Template)’ -> ‘Edit a Copy…’.
Looks like I’ve figured it out (bearing in mind I’m using Blend 2 February 2008 Beta so it could be a bug)…
When I create the ControlTemplate for the ListViewItems Blend adds a ContentPresenter instead of a GridViewRowPresenter. Interestingly it also gives the template a default name of ‘ListBoxItemControlTemplate1’.
When I apply the ControlTemplate to my ListView the ContentPresenter doesn’t display the underlying ‘DisplayMemberBinding’ defined on my GridViewColumns (I have my ContentPresenter set as ‘Content=”{TemplateBinding Content}”‘)- any idea how I can get the correct bindings to be displayed?
That is really wierd, I don’t think I’ve seen anything like that before. If you can, post your XAML up on the MSDN WPF Forum and point me to your post and I’ll take a look at it.
When I do the edit control template for the listview, the items no longer are under their respective columns. I am doing this on XP so it may be a side effect of that. Is there some property that needs to be set in order for the data to realign with the columns? Just to be clear, the rows are still there it is just that the data in each row is all left aligned so the data looks like this: column1datacolumn2datacolumn3data. Any ideas?
Keep up the good work! ( and fill in those coming soon spots 😉 )