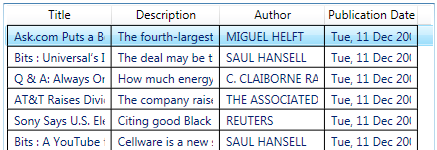
So you want grid lines in your listview, huh? Something that looks a little like this?
OK, we can do this the easy way and the hard way.
The easy way:
Put the code below into your resources:
<DataTemplate x:Key=”MyDataTemplate“>
<Border BorderBrush=”#FF000000” BorderThickness=”1,1,0,0” Margin=”-6,-2,-6,-2“>
<StackPanel Margin=”6,2,6,2“>
<TextBlock Text=”{Binding MySpecialBinding}“/>
</StackPanel>
</Border>
</DataTemplate>
The margin issues are to get the template to fit properly into the space provided. However, this won’t work properly unless your ItemContainerStyle plays nice. And this means setting your HorizontalContentAlignment to “Stretch” as seen below:
<Style x:Key=”MyItemContainerStyle” TargetType=”{x:Type ListViewItem}“>
<Setter Property=”HorizontalContentAlignment” Value=”Stretch” />
<Setter Property=”VerticalContentAlignment” Value=”Stretch” />
</Style>
So now all the resources are in place, so we can reference them in the appropriate spots in our ListView. See below:
<ListView ItemContainerStyle=”{DynamicResource MyItemContainerStyle}“>
<ListView.View>
<GridView>
<GridViewColumn Header=”Whatever” CellTemplate=”{DynamicResource MyDataTemplate}“ />
</GridView>
</ListView.View>
</ListView>
This will give you a nice healthy black border. To change the color, just change the BorderBrush property in the dataTemplate to your favorite hex color. I know you have one… use it!
Me? I’m a #FF4AA0D8 kind of guy, as I’m sure you could tell from my blog.
Also, as another note, you’ll want your last column in your listview to point to a dataTemplate with the following BorderThickness:
BorderThickness=”1,1,1,0”
But you probably would have figured that out for yourself.
The hard way:
The hard way involves me actually taking the time to create a Blend walkthrough so that involves developing a deeper understanding of why the above works the way it does. In other words, it’s coming soon.