Several months back, I was doing some work for a company that was using WPF for a stylus based application. One of the things that they found they needed was a scrollbar that could be used by left handed people who would have to cover the entire screen with their left hand in order to scroll a traditional scroll viewer.
The solution ended up being so easy in WPF that I thought I’d post it here.
I’m in a two-birds-one-stone mood, so we’ll do this for both the listview, which will also cover a more traditional scrollviewer. Let’s start with our ever friendly listview.
 At the very sight of this thing, with a stylus in hand, your average lefty is thinking to him or herself “I wonder if I can do my work upside down?” Let’s show them that we love and accept them just as they are.
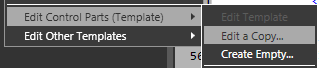
The first thing we’re going to do is create a new template for this sucker, so right click on your listview and go to “Edit Control Parts (Template) -> Edit a Copy…”
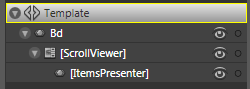
Now we’re looking at the standard listview template. Mine looks like this:
 Let’s dig right into the ScrollViewer. If you’re doing this from the listview (like I am) then creating a template for the listview has already created a template for the scrollviewer. If you’re starting from a basic scrollviewer, you can pretty much start right here.
For the purposes of making this thing easy to work with in Blend, go ahead and set the HorizontalScrollBarVisibility and VerticalScrollBarVisibility to Visible.

And then “Edit Control Parts (Template) -> Edit a Copy…” (or “Edit Control Parts (Template) -> Edit Template” if it is available).
We are now looking at the guts of the ScrollViewer Control.
ListView ScrollViewer will look like this:
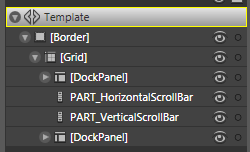 The normal ScrollViewer will look like this:
For our purposes, they’re functionally the same. It is actually a fairly simple control… basically just a Grid panel with the columns and rows set up like so:
<Grid.ColumnDefinitions>
<ColumnDefinition Width=”*“/>
<ColumnDefinition Width=”Auto“/>
</Grid.ColumnDefinitions>
<Grid.RowDefinitions>
<RowDefinition Height=”*“/>
<RowDefinition Height=”Auto“/>
</Grid.RowDefinitions>
The scrollBars are set up so that their visibility is tied to (duh) the visibility that is set on the control. But what this does is it means that when they are collapsed… they Grid reclaims the space that they were taking up.
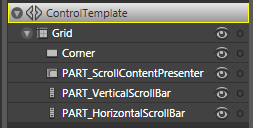
Now… here’s the hilarious part… in order to make this ScrollViewer left handed, all you have to do is swap the Grid.Columns:
<Grid.ColumnDefinitions>
<ColumnDefinition Width=”Auto“/>
<ColumnDefinition Width=”*“/>
</Grid.ColumnDefinitions>
You’ve now switched the columns so that the left handed column is auto. Here’s a list of the Grid.Column realignments you’ll need to make:
Change Column to “1”:

- PART_HorizontalScrollBar
- All DockPanels (ListView only)
- PART_ScrollContentPresenter (ScrollViewer only)
- Corner (ScrollViewer only)
Change Column to “0”:

- PART_VerticalScrollBar
Basically, swap everything from in the two columns.
Done.
 If you want to make this a more robust control, I recommend creating a ScrollViewer with an additional dependency property (IsSouthPaw or something). Make it so that your Grid has three columns:
<Grid.ColumnDefinitions>
<ColumnDefinition Width=”Auto“/>
<ColumnDefinition Width=”*“/>
<ColumnDefinition Width=”Auto“/>
</Grid.ColumnDefinitions>
And then you can just create a trigger that swaps the column placement of your PART_VerticalScrollBar. Such a trigger will look something like this. And by “something”, I mean “exactly”.
<Trigger Property=”IsSouthPaw” Value=”True“>
<Setter Property=”Grid.Column” TargetName=”PART_VerticalScrollBar” Value=”0” />
</Trigger>
Go forth and make Ned Flanders proud.
By the way, I listen to pop punk whenever I write my tutorials and I just thought I should let Senses Fail know that they can probably get away with about 80% less “dying cat” screaming and still put out good music. You know… because they’re probably WPF programmers on the side and they’ll probably read this to solve all their left-handed scrollbar needs.