Please Read: Strangely, when you do a Google search for “wpf” and “listview”, this is one of the top links. This is odd because this particular post is kind of an advanced tutorial. If you’re looking for more general information on styling the wpf listview, check out this post. It is probably much closer to what you’re looking for.
This is a bit of an advanced tutorial. I’m putting it up because I just figured out how to do it and I want to share. You can also download the project files for this tutorial (in zip format… requires .Net 3.5).
Recently, I received from my user experience designers a wireframe that looked something like this:

As you can see, there are embedded categories (categories within categories) here. I considered many solutions (hacks), but I found that a deeper understanding of the ListView and how it works would allow me to resolve this issue very simply (and without even touching the code behind).
<Exposition>
So… within every ListView, there is a Gridview that holds a set of GridViewColumns. What I didn’t realize until a couple days ago was that when you put the GridViewColumns into the GridView, you’re implicitly handing the GridView a GridViewColumnCollection.This collection is then referenced by the GridViewHeaderRowPresenter (located deep inside the ListView Template) and the GridViewRowPresenter, which is located inside the ListViewItem template (which I usually get to through the ItemContainerStyle… see here for more details).
Anyway, these two presenters databind back up to the GridView to grab the GridViewColumns that we’ve defined.
Once I understood that, I realized that I could create a GridViewColumnCollection as a resource and the reference it inside some custom templates.
At this point, I get the feeling that some readers are just hearing “blah blah blah”. It’s actually easier to demonstrate than it is to explain. So let’s get to it.
</Exposition>
We’re going to grab the header image from the New York Times RSS feed and display it in its own column while displaying all the accompanying header data under a broad Images header with sub-columns called Title, URL, and Link. It will look like this:

Resources
First, lets deal with all the resources we need. Take note that this part will be pretty XAML heavy.
Create a resources section. If mine isn’t in a separate resource dictionary, I usually just create it at the top of the window as seen below.
<Window.Resources>
</Window.Resources>
All your resources stuff will go in between those two tags.
Create a GridViewColumnCollection in the resources:
<GridViewColumnCollection x:Key=”ImageColumnCollection“>
<GridViewColumn Header=”Title” />
<GridViewColumn Header=”URL” />
<GridViewColumn Header=”Link” />
</GridViewColumnCollection>
Now, go through the motions to getting your RSS feed. Follow the steps I lay out in my post on getting the New York Times RSS feeds, except that, instead of clicking on the item(Array), click on the image section. Continue on with the “Create Data Template” option to get your RSS bindings automated.
Grab the bindings in this template and put them into the DisplayMemberBinding property in the GridViewColumns. Your GridViewColumnCollection should now look like this:
<GridViewColumnCollection x:Key=”ImageColumnCollection“>
<GridViewColumn Header=”Title”
DisplayMemberBinding=”{Binding Mode=OneWay, XPath=title}” />
<GridViewColumn Header=”URL”
DisplayMemberBinding=”{Binding Mode=OneWay, XPath=url}” />
<GridViewColumn Header=”Link”
DisplayMemberBinding=”{Binding Mode=OneWay, XPath=link}” />
</GridViewColumnCollection>
Now that we have our GridViewColumnCollection in place, let’s create some stuff that will actually use it.
Create a new empty Data Template. If you’re still uncomfortable digging into the XAML itself, you can just type the following in:
<DataTemplate x:Key=”MultiColumnHeaderTemplate“>
</DataTemplate>
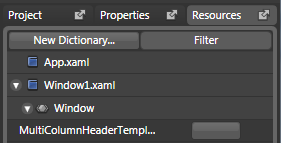
And then go to your resources tab and double click on it to make it accessible in the design mode.

The way I set this up was very simple. I put in a grid with two rows set to auto, put a TextBlock in the top one and a GridViewHeaderRowPresenter into the other one. The TextBlock at the top is bound to the Header Content with a simple binding:
Text=”{Binding}”
The real trick is that the GridViewHeaderRowPresenter is bound to our Columns resource by simply entering the following property:
Columns=”{DynamicResource ImageColumnCollection}”
Now, each column in that collection will send its header information to be handled by this particular GridViewHeaderRowPresenter.
Our final header data template looks something like this:
<DataTemplate x:Key=”MultiColumnHeaderTemplate“>
<Grid>
<Grid.RowDefinitions>
<RowDefinition Height=”Auto” />
<RowDefinition Height=”Auto” />
</Grid.RowDefinitions>
<TextBlock Text=”{Binding}”
HorizontalAlignment=”Center“/>
<GridViewHeaderRowPresenter Grid.Row=”1”
HorizontalAlignment=”Stretch”
Columns=”{DynamicResource ImageColumnCollection}” />
</Grid>
</DataTemplate>
That takes care of our headers… what about our item data? How do I get this data to fit into the proper columns? This was a problem I struggled with for quite some time until a friend of mine pointed out that the GridViewRowPresenter in the ItemTemplate could be extracted and used where ever I wanted to use it. Resultingly, I could place it into the CellTemplate of my Image Information column to compliment the placement of the GridViewHeaderRowPresenter in the Header of that same column.
If you’re following along and trying hard to learn, create a new DataTemplate and just toss a GridViewRowPresenter into it, binding it to the same column collection. Or you can just copy and paste the XAML below. Your choice.
<DataTemplate x:Key=”MultiColumnCellTemplate“>
<Grid>
<GridViewRowPresenter HorizontalAlignment=”Stretch”
Columns=”{DynamicResource ImageColumnCollection}” />
</Grid>
</DataTemplate>
This will be the basis of our embedded column design. We’re almost there, let’s just tie up some resources loose ends.
In order to get the image to show up in the “Image” column, we need to create a handy little DataTemplate to display that image. Simply have an image in the Data Template and have the Source property point to the url binding for the image like so:
<DataTemplate x:Key=”ImageTemplate“>
<Image Source=”{Binding Mode=OneWay, XPath=url}” />
</DataTemplate>
OK… we are now ready to actually do something outside of our resources. Don’t worry, this will be fast.
Main XAML Composition
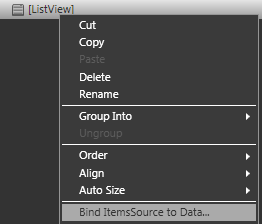
If you haven’t already drawn a ListView in your main window, do so now. Right click on the ListView and go to Bind ItemSource to Data…

In the resulting pop-up choose your RSS Feed (mine is called NYTTech) and select the image option from it. (If you haven’t added the RSS feed, just copy and paste the line below to the top of your resources.)
<XmlDataProvider x:Key=”NYTTech”
d:IsDataSource=”True”
Source=”http://www.nytimes.com/services/xml/rss/nyt/Technology.xml” />
Now, in the interest of time, we’re going to go right into the XAML. If you’re interested in seeing how to do this using Blend only, check this post out. Trust me, it’s not worth it.
Because we’ve already constructed most of what we need in the resources, we only need to do a couple things here. First, create two GridViewColumns, one with
Header=”Image”
and another with
Header=”Image Information”
In the Image column, set
CellTemplate=”{StaticResource ImageTemplate}”
In the Image Information column (which is our column with embedded columns), we just need to point to our already constructed templates like so:
<GridViewColumnHeader Header=”Image Information“
HeaderTemplate=”{StaticResource MultiColumnHeaderTemplate}”
CellTemplate=”{StaticResource MultiColumnCellTemplate}” >
Go ahead and run the project and you’ll see that we have one tiny little problem left.
Because the default content alignment of the header style is to center everything, all of our columns are misaligned. To solve this problem, copy the following style into your resources:
<Style x:Key=”StretchHeaderStyle” TargetType=”{x:Type GridViewColumnHeader}“>
<Setter Property=”HorizontalContentAlignment” Value=”Stretch“/>
</Style>
And point to it in your ListView GridView with a :
ColumnHeaderContainerStyle=”{StaticResource StretchHeaderStyle}”
At the end, your ListView should look like this:
<ListView IsSynchonizedWithCurrentItem=”True“>
<ListView.View>
<GridView ColumnHeaderContainerStyle=”{StaticResource StretchHeaderStyle}” >
<GridViewColumn Header=”Image“
CellTemplate=”{StaticResource ImageTemplate}” >
<GridViewColumn Header=”Image Information“
HeaderTemplate=”{StaticResource MultiColumnHeaderTemplate}”
CellTemplate=”{StaticResource MultiColumnCellTemplate}” >
</GridView>
<ListView.View>
</ListView>
And if you hate writing XAML, you notice with a grateful heart that I’ve posted every bit of XAML you need right here. Additionally (and this is a first for this site), because of the complexity of this post, I’m offering this project as a downloadable zip file so you can tweak it or futz with it at your convenience.
Embedded Columns Project Files (in zip format… requires .Net 3.5)