OK, I hope no one is using my last post as an example of what you should be doing when interfacing the Wiimote with WPF. Because it was completely hack-tastic.
Instead, use my new WPF/Wii library. It uses the WPF INotifyPropertyChanged interface to act as an interface so that we can bind the Wiimote data directly to the XAML. More on that in a little bit, but first…
In this post, we’ll walk through creating a basic multi-point capable app that uses the Wiimote as an input device. What is really unique about this post is the fact that we’re going to do this in a way that requires absolutely no code whatsoever on your part.
That’s right. No code. At all. Zero knowledge of C# required.
First, download the “WPF_Wii_Binding_Library” and the “WiimoteLib” dlls, unzip them and put them in the same folder (somewhere you can find them).
Open up Blend or Visual Studio 2008 and start a new application. (Visual Studio 2008 is reccomended for this tutorial.)
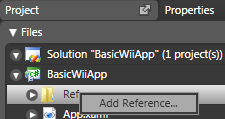
Now, head right on over to your “Project” tab or “Solution Explorer” and right click on the “References” folder and click “Add Reference”.
Blend

VS 2008

Browse for the reference “WPF_Wii_Binding_Library” (the one you just downloaded) and click “Open”.
In your main composition, add a “Canvas”.
<Canvas>
</Canvas>
Draw three ellipses and give them three different colors.

Define the following XML namespace Window:
<Window …
xmlns:Wii=”clr-namespace:WPF_Wii_Binding_Library;assembly=WPF_Wii_Binding_Library“>
In your Resources, add the following resources (you can just copy this code if you want):
<Wii:WPFWii x:Key=”WiiData” IsMultiPointMode=”True” />
<BooleanToVisibilityConverter x:Key=”boolToVis” />
Note: If you’re using anything less than Blend 2 December Preview, I can make no guarantees that this solution won’t throw a fit. Even with the B2DP, it is still having issues. The best way to do this is really through Visual Studio 2008. But if you don’t mind just typing all your XAML, Blend will still compile fine.
Find your first Ellipse in the XAML. Add the following Visibility property:
Visibility=”{Binding Source={StaticResource WiiData}, Path=IR1Found, Converter={StaticResource boolToVis}}”
What this is doing is connecting to the Wiimote and checking to see if it can see your first infrared LED. I suggest using the sensor bar that comes with the Wii for the time being. If it can see the LED, your ellipse will be visible. If it can’t, it won’t.
It is now time for us to make the magic. Replace whatever “Canvas.Left” and “Canvas.Top” properties so that your Ellipse looks like the following:
<Ellipse Width=”30″
Height=”30″
Fill=”#FF0045FF”
Stroke=”#FF000000″
Visibility=”{Binding Source={StaticResource WiiData}, Path=IR1Found, Converter={StaticResource boolToVis}}”
Canvas.Left=”{Binding Source={StaticResource WiiData}, Path=IR1Position.X, Mode=OneWay}”
Canvas.Top=”{Binding Source={StaticResource WiiData}, Path=IR1Position.Y, Mode=OneWay}” />
We’re binding that ellipse to the X,Y position the Wiimote has tracked the first infrared LED. Let’s do the same with our second infrared LED and the midpoint between the two LEDs.
LED number 2:
Visibility=”{Binding Source={StaticResource WiiData}, Path=IR2Found, Converter={StaticResource boolToVis}}”
Canvas.Left=”{Binding Source={StaticResource WiiData}, Path=IR2Position.X, Mode=OneWay}”
Canvas.Top=”{Binding Source={StaticResource WiiData}, Path=IR2Position.Y, Mode=OneWay}”
Mid point:
Visibility=”{Binding Source={StaticResource WiiData}, Path=MidPointFound, Converter={StaticResource boolToVis}}”
Canvas.Left=”{Binding Source={StaticResource WiiData}, Path=MidPointPosition.X, Mode=OneWay}”
Canvas.Top=”{Binding Source={StaticResource WiiData}, Path=MidPointPosition.Y, Mode=OneWay}”
Guess what?
You’re done. That’s all you need. Just make sure your Wiimote is connected to your computer and you’re ready to rock and roll. (Need help with that part? Check here.)
You’ve just created a Wiimote application with 0 (zero) lines of custom code and (depending on your formatting) less than 20 lines of XAML markup.
The next tutorial may take a week or more to make since I need to wait for my infrared lights and circuits to come in in order to build an infrared array. (Don’t worry, I’ll be posting a tutorial on how to build that infrared array. That tutorial will assume that you have never touched a circuit in your life.)