OK, I hope no one is using my last post as an example of what you should be doing when interfacing the Wiimote with WPF. Because it was completely hack-tastic.
Instead, use my new WPF/Wii library. It uses the WPF INotifyPropertyChanged interface to act as an interface so that we can bind the Wiimote data directly to the XAML. More on that in a little bit, but first…
In this post, we’ll walk through creating a basic multi-point capable app that uses the Wiimote as an input device. What is really unique about this post is the fact that we’re going to do this in a way that requires absolutely no code whatsoever on your part.
That’s right. No code. At all. Zero knowledge of C# required.
First, download the “WPF_Wii_Binding_Library” and the “WiimoteLib” dlls, unzip them and put them in the same folder (somewhere you can find them).
Open up Blend or Visual Studio 2008 and start a new application. (Visual Studio 2008 is reccomended for this tutorial.)
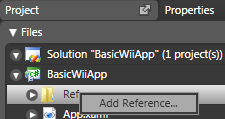
Now, head right on over to your “Project” tab or “Solution Explorer” and right click on the “References” folder and click “Add Reference”.
Blend
VS 2008

Browse for the reference “WPF_Wii_Binding_Library” (the one you just downloaded) and click “Open”.
In your main composition, add a “Canvas”.
<Canvas>
</Canvas>
Draw three ellipses and give them three different colors.

Define the following XML namespace Window:
<Window …
xmlns:Wii=”clr-namespace:WPF_Wii_Binding_Library;assembly=WPF_Wii_Binding_Library“>
In your Resources, add the following resources (you can just copy this code if you want):
<Wii:WPFWii x:Key=”WiiData” IsMultiPointMode=”True” />
<BooleanToVisibilityConverter x:Key=”boolToVis” />
Note: If you’re using anything less than Blend 2 December Preview, I can make no guarantees that this solution won’t throw a fit. Even with the B2DP, it is still having issues. The best way to do this is really through Visual Studio 2008. But if you don’t mind just typing all your XAML, Blend will still compile fine.
Find your first Ellipse in the XAML. Add the following Visibility property:
Visibility=”{Binding Source={StaticResource WiiData}, Path=IR1Found, Converter={StaticResource boolToVis}}”
What this is doing is connecting to the Wiimote and checking to see if it can see your first infrared LED. I suggest using the sensor bar that comes with the Wii for the time being. If it can see the LED, your ellipse will be visible. If it can’t, it won’t.
It is now time for us to make the magic. Replace whatever “Canvas.Left” and “Canvas.Top” properties so that your Ellipse looks like the following:
<Ellipse Width=”30″
Height=”30″
Fill=”#FF0045FF”
Stroke=”#FF000000″
Visibility=”{Binding Source={StaticResource WiiData}, Path=IR1Found, Converter={StaticResource boolToVis}}”
Canvas.Left=”{Binding Source={StaticResource WiiData}, Path=IR1Position.X, Mode=OneWay}”
Canvas.Top=”{Binding Source={StaticResource WiiData}, Path=IR1Position.Y, Mode=OneWay}” />
We’re binding that ellipse to the X,Y position the Wiimote has tracked the first infrared LED. Let’s do the same with our second infrared LED and the midpoint between the two LEDs.
LED number 2:
Visibility=”{Binding Source={StaticResource WiiData}, Path=IR2Found, Converter={StaticResource boolToVis}}”
Canvas.Left=”{Binding Source={StaticResource WiiData}, Path=IR2Position.X, Mode=OneWay}”
Canvas.Top=”{Binding Source={StaticResource WiiData}, Path=IR2Position.Y, Mode=OneWay}”
Mid point:
Visibility=”{Binding Source={StaticResource WiiData}, Path=MidPointFound, Converter={StaticResource boolToVis}}”
Canvas.Left=”{Binding Source={StaticResource WiiData}, Path=MidPointPosition.X, Mode=OneWay}”
Canvas.Top=”{Binding Source={StaticResource WiiData}, Path=MidPointPosition.Y, Mode=OneWay}”
Guess what?
You’re done. That’s all you need. Just make sure your Wiimote is connected to your computer and you’re ready to rock and roll. (Need help with that part? Check here.)
You’ve just created a Wiimote application with 0 (zero) lines of custom code and (depending on your formatting) less than 20 lines of XAML markup.
The next tutorial may take a week or more to make since I need to wait for my infrared lights and circuits to come in in order to build an infrared array. (Don’t worry, I’ll be posting a tutorial on how to build that infrared array. That tutorial will assume that you have never touched a circuit in your life.)
Over the years, the technology has advanced and PCB Manufacturers today use superior technology for Printed Circuit Boards’ production. In the warp-speed world of technology, five years
is an eternity. It’s best regarding automated companies make use
of Printed circuit boards such as IPC-6012 Class three to
make certain reduced sign decline in addition to understanding inside frequency when shifting signals throughout these units.
No matter if some one searches for his necessary thing, thus he/she desires to be available that in detail, therefore
that thing is maintained over here.
Visit my blog post – sit In kayaks
Howdy! This blog post couldn’t be written much better!
Looking at this post reminds me of my previous roommate!
He constantly kept talking about this. I most certainly
will send this article to him. Fairly certain he’ll have a good read.
Thank you for sharing!
My page :: art glass vases and bowls
Thanks for finally talking about > WPF Wii Multi-Point Tutorials, Part 2: Writing a Code-less
Wiimote Program | Matthias Shapiro < Liked it!
Here is my blog find a modeling agency
Do you mind if I quote a few of your articles
as long as I provide credit and sources back to your website?
My blog site is in the very same niche as yours and my visitors would definitely benefit from some of the information you provide here.
Please let me know if this okay with you. Appreciate it!
disney infinity coloring page
If some one wishes to be updated with most up-to-date technologies therefore he must be pay a
quick visit this website and be up to date everyday.
my site: pawn shops near me open late
Touche. Sound arguments. Keep up the great effort.
Take a look at my site – pawn shops near me now
I’m really enjoying the design and layout of your website.
It’s a very easy on the eyes which makes it much more enjoyable for
me to come here and visit more often. Did you hire out a designer to create your
theme? Outstanding work!
*That was supposed to be, “I put:
into my ‘App.xaml’ inside the tag”
Here is some more info:
I put:
into my ‘App.xaml’ inside
Is this correct, or am I way off?
The error I get doing this is: “Error1The type ‘Wii:WPFWii’ was not found. Verify that you are not missing an assembly reference and that all referenced assemblies have been built.”
Hi Matthias,
This is fantastic stuff -thanks so much for the step by steps on how to IR points talking to a program.
I have a very newbish question (not a programmer here): When you say ‘add the following resources…’ where do I add these? Is this pasted somewhere in the xaml, or do I need to create a .resx and put it in there?
Thank you!
OK… here is an updated project files. It is slap dash and will break with the balance board… outside of that it should be working. I hope this helps…
Hi,
Great Application! I just started to build my own Wii application, but unfortunately, I run into the same problem as Ernesto and Carlos. Any progress on that point?
Best regards, Joost
Sorry for the delay… This code is almost a year old and, in the meantime, Brian Peek has updated his library. I’m working on rebuilding this project with the new Wiimote Library, but it is going to take a week or so. Apologies.
I’m getting the same error as Ernesto Herrera, would appreciate some help.
I’m triying to compile the project but i have an error when I add the resource:
Error 1 Could not create an instance of type ‘WPFWii’. C:Documents and Settingsernesto.herreraMis documentosVisual Studio 2008ProjectsWpfWiiWpfWiiWindow1.xaml 7 9 WpfWii
Regards
I don’t think the libs will work in Silverlight projects. It is my understanding (perhaps incorrect) that the Silverlight sandbox makes it next to impossible to connect to an outside Bluetooth device. You would probably need to port the entire Wiimote reader library to get it to work.
I’m trying to add your lib to my silverlight project, but when I add the reference I get the response that it is not build against silverlight runtime…. 🙁 Anyone?
Hi!
I was doing you example but my ellipse doesn´t move from the left side of the screen 🙂
It only appear and dissapear if I point to the LED lamp or not.
Will you be providing the source for this library soon? I can’t sign my project currently because it wants all DLL’s that it references to be signed.
You have inspired me to go out and buy a Wii remote tonight! This looks really cool, thanks for the info.